jsrpc
0. 前言
一句话概括一下rpc在爬虫中应用: 在浏览器(作为我们的客户端)找到加密后的参数,然后发送给服务端(python编写的一个本地服务),最后真正爬虫的时候调用这个服务就能获取加密数据了。不需要扣代码和补环境那些。
1. 从WebSocket认识rpc
WebSocket 是 HTML5 开始提供的一种在单个 TCP 连接上进行全双工通讯的协议。
WebSocket 使得客户端和服务器之间的数据交换变得更加简单,允许服务端主动向客户端推送数据。在 WebSocket API 中,浏览器和服务器只需要完成一次握手,两者之间就直接可以创建持久性的连接,并进行双向数据传输。
在 WebSocket API 中,浏览器和服务器只需要做一个握手的动作,然后,浏览器和服务器之间就形成了一条快速通道。两者之间就直接可以数据互相传送。
现在,很多网站为了实现推送技术,所用的技术都是 Ajax 轮询。轮询是在特定的的时间间隔(如每1秒),由浏览器对服务器发出HTTP请求,然后由服务器返回最新的数据给客户端的浏览器。这种传统的模式带来很明显的缺点,即浏览器需要不断的向服务器发出请求,然而HTTP请求可能包含较长的头部,其中真正有效的数据可能只是很小的一部分,显然这样会浪费很多的带宽等资源。
HTML5 定义的 WebSocket 协议,能更好的节省服务器资源和带宽,并且能够更实时地进行通讯。


简单来说,就是分为服务端和客户端,客户端想服务发送请求,会获取相应的响应。类似你打开www.baidu.com会得到一个百度首页一样。话不多说,直接看例子:
1.1 python中
建立服务端server.py,会在本地构建websocket服务器,端口8010启动:
1 | import asyncio |
建立客户端client.py,和指定的url建立websocket连接,并发送消息,等待接受消息:
1 | import asyncio |
先执行server.py让服务端运行起来,再运行client.py会得到如下:

1.2 js中
服务端依然上面的python代码,客户端为js代码,在控制台输入如下代码:
1 | (function() { |

这也是纯手工rpc的雏形。在本地建立服务端,浏览器作为客户端发送加密参数(这里以cookie举例)
说明: 实际使用会对js代码进行override,更普遍的方式是采用后面介绍的框架进行。
2. jsrpc
2.1 下载运行开启服务端
下载编译好的文件:jxhczhl/JsRpc,运行开启服务

2.2 定义客户端函数
复制JsEnv中的代码粘贴到网站控制台
说明: 定义相关函数,后续使用


2.3 注入,发送加密数据
注入ws与方法,在控制台输入如下代码:
1 | // 连接通信 |

2.4 访问获取数据
访问链接:http://127.0.0.1:12080/go?group=hhh&name=baidu&action=hello¶m=yes
会的到如下结果:
这样我们就可能访问链接得到加密结果啦

3. serkio
3.1 下载安装运行
下载:https://github.com/virjar/sekiro
需要安装java和maven,运行代码中的build_demo_server.sh

会生成target文件夹,

window运行里面的bat文件

说明: 也可以直接下载Go HTTP File Server (iinti.cn)
3.2 客户端(js)发送信息
打开文档快速上手 | sekiro (iinti.cn),复制浏览器js环境中代码,
1 | function SekiroClient(e){if(this.wsURL=e,this.handlers={},this.socket={},!e)throw new Error("wsURL can not be empty!!");this.webSocketFactory=this.resolveWebSocketFactory(),this.connect()}SekiroClient.prototype.resolveWebSocketFactory=function(){if("object"==typeof window){var e=window.WebSocket?window.WebSocket:window.MozWebSocket;return function(o){function t(o){this.mSocket=new e(o)}return t.prototype.close=function(){this.mSocket.close()},t.prototype.onmessage=function(e){this.mSocket.onmessage=e},t.prototype.onopen=function(e){this.mSocket.onopen=e},t.prototype.onclose=function(e){this.mSocket.onclose=e},t.prototype.send=function(e){this.mSocket.send(e)},new t(o)}}if("object"==typeof weex)try{console.log("test webSocket for weex");var o=weex.requireModule("webSocket");return console.log("find webSocket for weex:"+o),function(e){try{o.close()}catch(e){}return o.WebSocket(e,""),o}}catch(e){console.log(e)}if("object"==typeof WebSocket)return function(o){return new e(o)};throw new Error("the js environment do not support websocket")},SekiroClient.prototype.connect=function(){console.log("sekiro: begin of connect to wsURL: "+this.wsURL);var e=this;try{this.socket=this.webSocketFactory(this.wsURL)}catch(o){return console.log("sekiro: create connection failed,reconnect after 2s:"+o),void setTimeout(function(){e.connect()},2e3)}this.socket.onmessage(function(o){e.handleSekiroRequest(o.data)}),this.socket.onopen(function(e){console.log("sekiro: open a sekiro client connection")}),this.socket.onclose(function(o){console.log("sekiro: disconnected ,reconnection after 2s"),setTimeout(function(){e.connect()},2e3)})},SekiroClient.prototype.handleSekiroRequest=function(e){console.log("receive sekiro request: "+e);var o=JSON.parse(e),t=o.__sekiro_seq__;if(o.action){var n=o.action;if(this.handlers[n]){var s=this.handlers[n],i=this;try{s(o,function(e){try{i.sendSuccess(t,e)}catch(e){i.sendFailed(t,"e:"+e)}},function(e){i.sendFailed(t,e)})}catch(e){console.log("error: "+e),i.sendFailed(t,":"+e)}}else this.sendFailed(t,"no action handler: "+n+" defined")}else this.sendFailed(t,"need request param {action}")},SekiroClient.prototype.sendSuccess=function(e,o){var t;if("string"==typeof o)try{t=JSON.parse(o)}catch(e){(t={}).data=o}else"object"==typeof o?t=o:(t={}).data=o;(Array.isArray(t)||"string"==typeof t)&&(t={data:t,code:0}),t.code?t.code=0:(t.status,t.status=0),t.__sekiro_seq__=e;var n=JSON.stringify(t);console.log("response :"+n),this.socket.send(n)},SekiroClient.prototype.sendFailed=function(e,o){"string"!=typeof o&&(o=JSON.stringify(o));var t={};t.message=o,t.status=-1,t.__sekiro_seq__=e;var n=JSON.stringify(t);console.log("sekiro: response :"+n),this.socket.send(n)},SekiroClient.prototype.registerAction=function(e,o){if("string"!=typeof e)throw new Error("an action must be string");if("function"!=typeof o)throw new Error("a handler must be function");return console.log("sekiro: register action: "+e),this.handlers[e]=o,this}; |
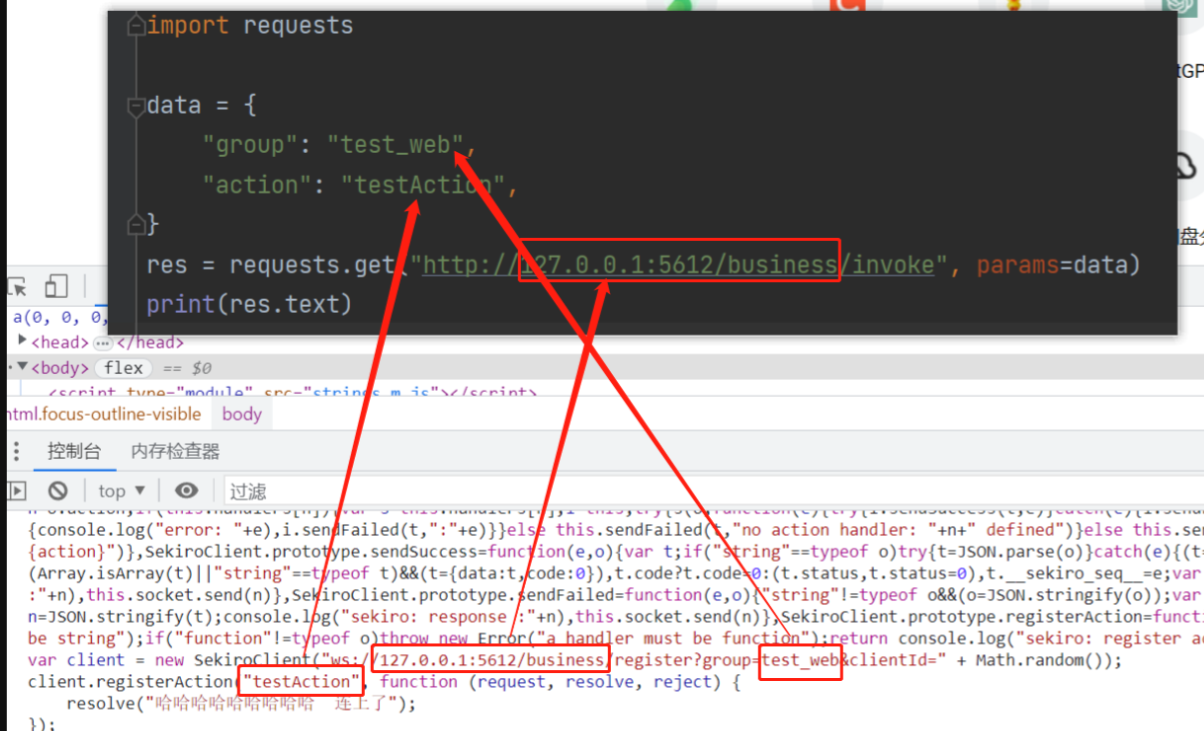
注意: 修改了链接,改为"ws://127.0.0.1这个。
可以访问127.0.0.1:5612/business/groupList,查查看分组
3.3 python访问服务端使用
python中使用,如下代码:
1 | import requests |

注意: python中的data数据group和action和上面js中链接保持一致

参考
[1] Python网络爬虫之js逆向之远程调用(rpc)免去抠代码补环境简介-腾讯云开发者社区-腾讯云 (tencent.com)
[2] 使用Python创建websocket服务和客户端请求_python websocket客户端接收服务器发送的数据-CSDN博客
[3] HTML5 WebSocket | 菜鸟教程 (runoob.com)
[4] Jsrpc学习——网易云热评加密函数逆向 - 掘金 (juejin.cn)


